Configure and Manage Roles

View our Pricing & Plans for a detailed list and comparison of features available in each plan. Docubee uses a role-based permission system to manage access, authorizing users to view and configure specific aspects/modules based on their roles within the organization. This approach enables administrators to define and grant access at a granular level, allowing team members to focus on their specific tasks and minimizing distractions from unrelated system components. Roles and Permissions Let’s understand our roles and permissions: The Organization Administrator determines and grants permissions based on the user's role within the organization. By assigning only the necessary permissions for each role, it reduces the potential for errors or mistakes.

Before You Begin

To configure and manage roles, you must:

Configure Roles

Organization Administrators can configure roles in the Organization Settings. Configuring a role involves creating a role, assigning permissions, and deploying the role. After a role is deployed, it can be assigned to users.
Note: The role will be in Organization Settings.
  1. Open the Organization Settings, click Settings in the left nav and then select Roles under Organization. org-roles
  2. In the Create a new Role section:
    1. Create Role
      1. Enter the role name in Type a role name. The role name must be unique within your organization.
      2. Specify a role type (Organization or Workspace) using the Select a role type dropdown. This indicates whether the role applies to the organization or specific workspaces.
      3. Specify a role level (Admin or Member) using the Select a role level dropdown. For example, admin roles will have admin permissions like system configuration, while member roles will have permissions that allow viewing aspects of the system.
      4. Click Create Role. The role will be created and the Assign Permissions page will open.
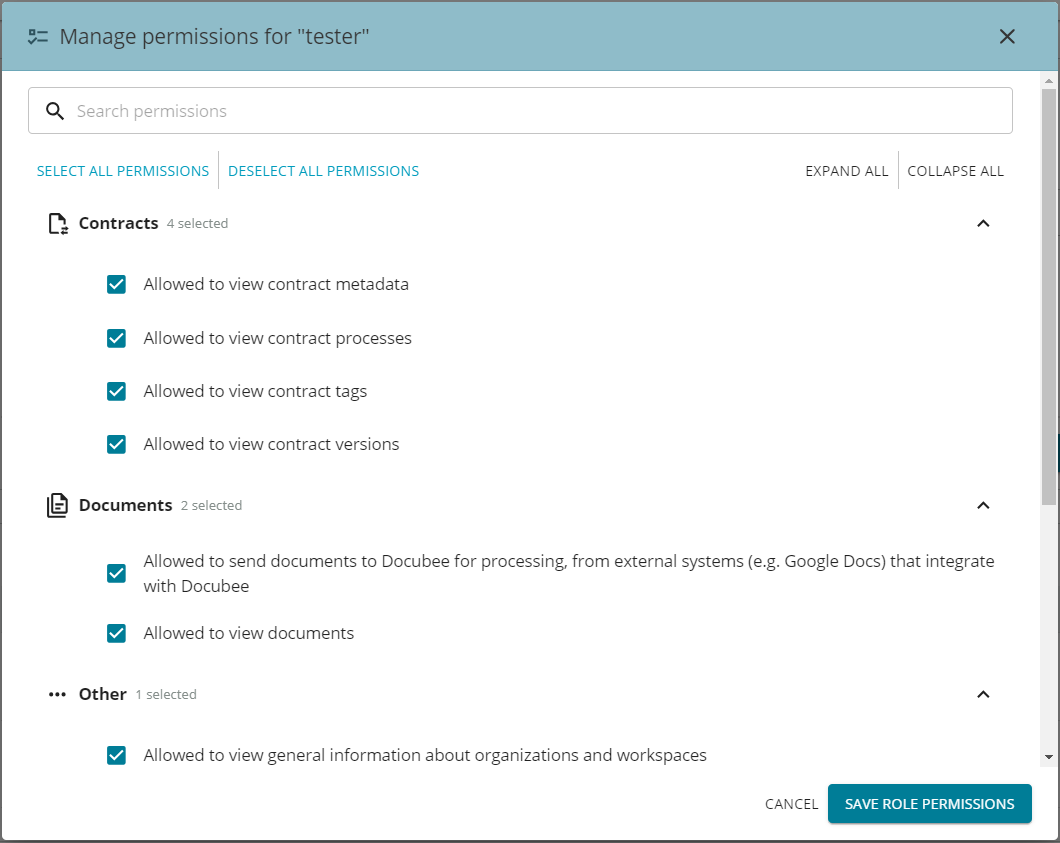
    2. Assign Permissions Assign permissions to be associated with the role. Note: To return to Create Role to modify any specifications, click Go Back To Create Role at the lower-left of this section. Note: If you click Skip to skip assigning permissions and deployment, you can do so later from the Manage Roles section. Confirm your intent by clicking Skip to End.
      1. The default permissions are pre-selected.
      2. Modify the role’s permissions by deselecting/ or selecting options under the categorized permissions.
      3. Click Save Role Permissions. The Deploy Role page will open.
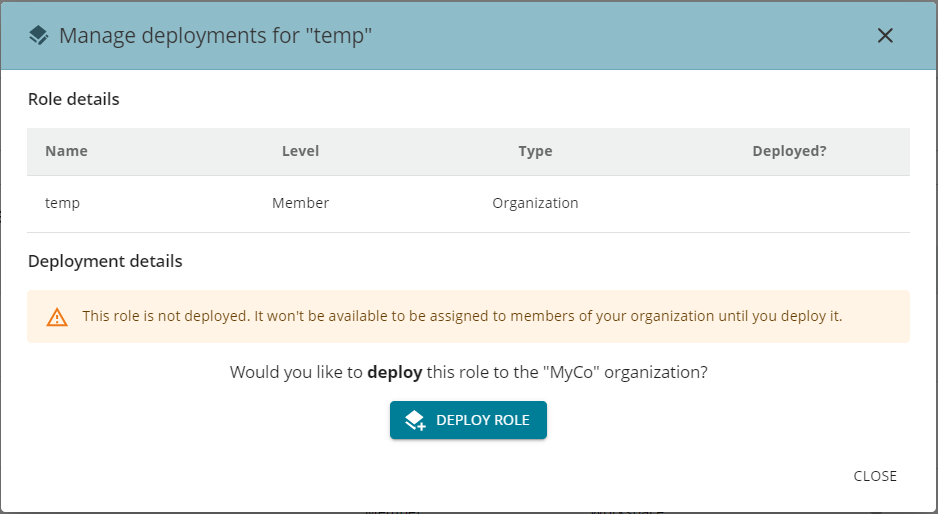
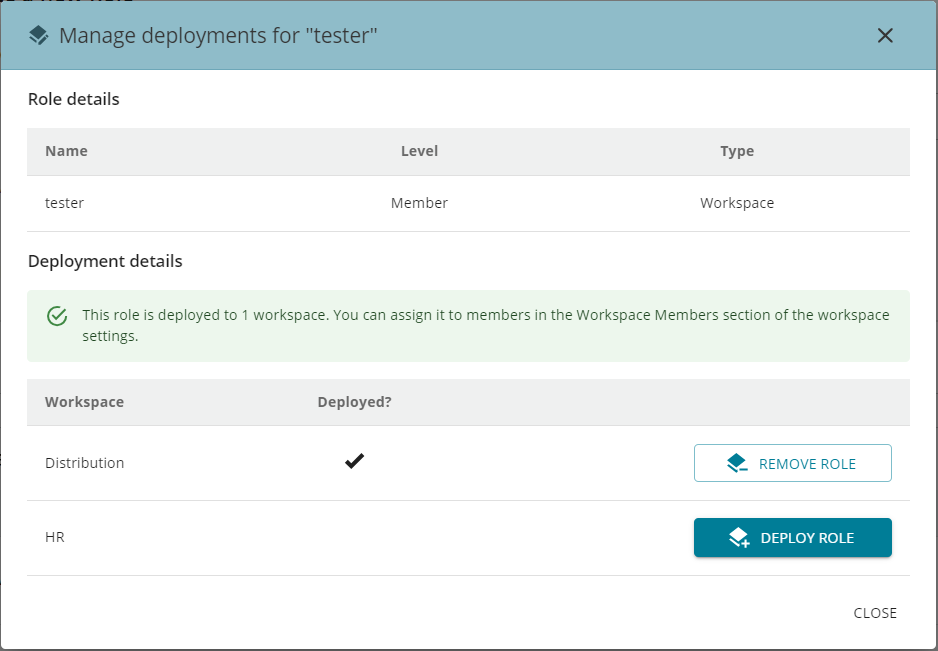
    3. Deploy Role Roles must be deployed to an organization or workspaces before they can be assigned to members. Deploying a role makes it available in the members Role dropdown list in both Organization Settings and Workspace Settings. If the role type is: - Organization - you can deploy it to the owning organization. - Workspace - you can deploy it to any workspace within the organization. Note: To return to Assign Permissions to modify any specifications, click Go Back To Assign Permissions at the lower-left of this section.
      1. Select the workspaces to which the role should be deployed using the Select workspaces to deploy this role to dropdown.
      2. Click Deploy Role.
    4. To create another role, click Create Another Role.

Default Roles

Docubee has a predefined set of default roles that cannot be modified: See the Members section in Overview of Organizations, Workspaces, and Members for information on default roles.

Assign Roles

After a role has been deployed, you can assign it to members.

Assign Organization Roles

To assign a role to an organization member:

Assign Workspace Roles

To assign a role to an workspace member:
  1. In Organization Settings, under Workspace Management, select the workspace and click Workspace Members.
  2. Use the Role dropdown to assign/modify a member's role. Note: The Role dropdown will list the available roles.

Manage Roles

The Manage Roles section lists all roles within the organization. Click the three vertical dots button at the end of the role’s row to open the shortcut menu with options to:

Manage Deployments

Click Manage Deployments in the shortcut menu to open the Manage Deployments for “<role_name>” modal.

Organization

To deploy a role for an organization, click Deploy Role. If the role has been deployed, click Remove Role to remove the role from the organization. manage-org-deployments

Workspace

To deploy a role for a workspace, next to a workspace name: manage-ws-deployments

Manage Permissions

To manage permissions:
  1. Click Manage Permissions in the shortcut menu to open the Manage Permissions for “<role_name>” modal, and modify and manage the permissions.
    1. Search for a permission or click Expand All to view all the permission categories and their permissions.
    2. Choose to select or deselect all permissions for the role, and then modify as necessary.
  2. Click Save Role Permissions to save the role’s permissions.
manage-permissions

Rename Role

To rename a role:
  1. Click Rename in the shortcut menu to open the Rename “<role_name>” modal.
  2. Enter a new role name and click Rename Role.

Duplicate Role

Duplicating a role will create a new role with the same permissions, level, and type. To duplicate a role:
  1. Click Duplicate in the shortcut menu to open the Duplicate<role_name>” modal.
  2. Enter a new role name and click Create Duplicate Role.
  3. Modify the permissions of the duplicated role to suit your new role's requirements.
  4. Deploy the role.

Delete Role

Before deleting a role, ensure it is removed from all locations it has been deployed. If you attempt to remove a deployed role, you will be informed that this role is currently assigned to members and cannot be removed. Assign a different role to members before proceeding. To delete a role:
  1. Click Delete in the shortcut menu to open the Delete<role_name>” modal.
  2. Click Delete Role to confirm your intent.

Related Information

Overview of Organizations, Workspaces, and Members Additional Resources Need more help getting set up? Contact us for assistance from our customer support team or register for Office Hours.