


Our Fields API allows you to dynamically place text on documents. Here’s how it works!
Docubee’s Fields API feature acts as a “find and replace”, placing fields in the designated spot on a document automatically. The API will dynamically look for the new text areas you’ve designated and place the fields in the appropriate area.
Use Case: Rental Agreements
The Fields API is a perfect solution for single or multi-page documents requiring multiple signatures. Using a rental agreement as our example, the API can automatically detect all signature fields and place legally binding eSignature boxes for customers to sign. This would appear anywhere in the document that says “Signature”.
Before You Begin
- The first step is to ensure that you have a Docubee account.
- Once your account is set up, you’ll need to create an API token.
- You’ll also need a document with placeholders.
- Documents using anchor strings must be searchable documents (i.e., Word Documents or PDF). You can use your favorite document editor to make your own, or you can use the one we’ve made for this article here: https://github.com/ontask-io/fields-api-demo-nodejs/blob/master/documents/fields-doc.pdf
Our sample document looks like this:
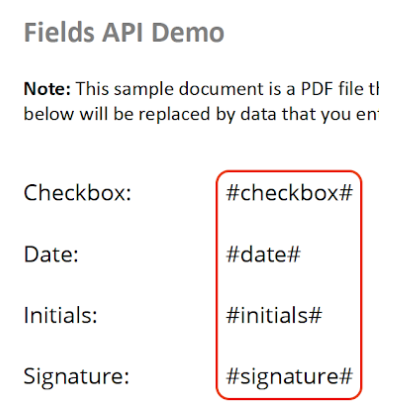
and uses placeholders that look like #this#, a text string beginning and ending with a pound sign.
Note: Your placeholders do not have to follow #this# convention; you can use any character string you wish as long as you configure your Fields API call accordingly.
Set Up Your API Token
Your API token will be sent as a header to authenticate your requests (this a requirement to use the Docubee API). See Generate API Access Tokens for information on creating your own API access token.
For this demo, your token will need to have at least the following permissions:
- Get documents
- Set document fields
- Upload documents
Find & Replace With the Fields API
For this demo, we are using Node.js (v16.0.0) with the node-fetch package, and Visual Studio Code. You can download the completed project folder here: https://github.com/ontask-io/fields-api-demo-nodejs
- To begin, create a new directory called docubee-fields-demo and open it in Visual Studio Code (or your IDE of choice).
- Run the
npm initcommand (accepting all the default options) in a terminal to create a new node project. - Run the
npm installnode-fetch command to download the node-fetch package.
- Run the
- Open the package.json file in the root of the docubee-fields-demo directory.
- Toward the end of the file, on the last line in the root object, add the following line to configure this project to use JavaScript modules.
- Then, create a new file called index.js and a subdirectory called documents within the docubee-fields-demo directory.
- Put the placeholder document you made or downloaded earlier in the documents directory.
Your directory structure should now look like this:

- Open the index.js file and add the following code to replace the <YOUR-API-TOKEN> placeholder with your API token:
import fetch from 'node-fetch'; import { readFileSync } from 'fs'; const docubeeUrl = 'https://docubee.app'; const apiToken = ''; - To place fields on the placeholder document, you’ll need a
documentIdwhich represents a document uploaded into the Docubee system. You’ll get that by using the Documents – Upload API. - In index.js, add the following code. Here, you declare your imports from node-fetch and fs. Then, you initialize variables to hold the Docubee base URL and your API token.
const uploadDocument = async (pathToFile) => {
     const response = await fetch(`https://docubee.app/api/v2/documents`, {
         body: readFileSync(pathToFile),
         headers: {
             Authorization: apiToken,
             'Content-Type': 'application/pdf'
         },
         method: 'POST'
     });

     const { documentId } = await response.json();

     return documentId;
 }
The uploadDocument() function takes a file path as it’s parameter, and makes a call to the Docubee API to upload the document at the file path into Docubee. It returns a
documentId, which you’ll need to use the Fields API. - Let’s make a function that will take this
documentIdand place fields on the document’s placeholders. Add the following code in index.js:const placeFieldsOnDocument = async (inputDocumentId) => { const response = await fetch(`${docubeeUrl}/api/v2/documents/${inputDocumentId}/fields`, { body: JSON.stringify({ fields: [ { anchorString: '#checkbox#', name: 'TestCheckbox', removeAnchorString: true, required: true, type: 'checkbox' }, { anchorString: '#date#', name: 'TestDate', removeAnchorString: true, required: true, type: 'date' }, { anchorString: '#initials#', name: 'TestInitials', removeAnchorString: true, required: true, type: 'initials' }, { anchorString: '#signature#', name: 'TestSignature', removeAnchorString: true, required: true, type: 'signature' } ] }), headers: { Authorization: apiToken, 'Content-Type': 'application/json' }, method: 'PUT' }); const { documentId } = await response.json(); return documentId; }The placeFieldsOnDocument() function takes the inputDocumentId which represents the
documentIdreturned from your Documents – Upload API call. The body of the Fields API is an array of objects where each object represents a text string that will be replaced by your fields throughout the document.There are 5 supported field types you can configure in the body of the request: checkbox, date, initials, signature, and text.
Each field type has configuration settings that allows you to tune how they are presented. The value of the anchorString is the placeholder text that will be replaced. If multiple instances of the anchor string are found in the document, the specified field type will be applied for each. See Documents – Fields for more information on how to configure the Fields API request body. - Now that your functions are set up, let’s run it! In index.js, add the final piece of code:
(async () => {
     const inputDocId = await uploadDocument('./documents/fields-doc.pdf');
     console.log(`inputDocId: ${inputDocId}`);

     const fieldsDocId = await placeFieldsOnDocument(inputDocId);
     console.log(`fieldsDocId: ${fieldsDocId}`);
 })();
Here, you call an anonymous function that calls your two functions you defined earlier in steps 9-11. We print out the
documentIdreturned from each; they should be exactly the same. This is because we reuse the document reference after we process and apply the fields to it with the Fields API.

The fields you create are specific to Docubee, and won’t appear on the document outside of Docubee. When the fields are applied to the document, it will look like this to the user:
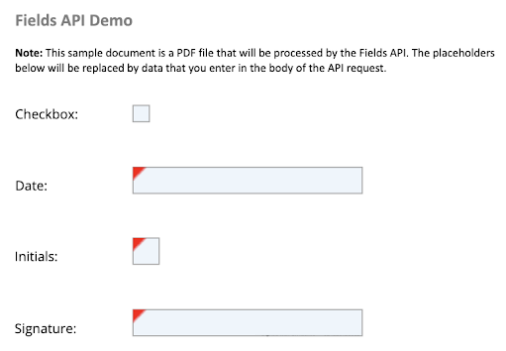
In the fill & sign task, the user will be able to interact and enter data into the fields. They can check the checkbox, pick a date, enter text, and sign the fields that you replaced with the Fields API.
Next Steps
Now that you have a document with fields, you can use the documentId to start a workflow that sends out our document for signature! Looking for information on how to interact with workflows using the API? Read our article, Start and Manage Workflows Programmatically.
Related Information
Need more help getting set up? Contact us for assistance from our customer support team or register for Office Hours.