Using Docubee’s New AI Document Generation Feature
Creating documents like employee handbooks, contracts, transaction agreements, NDAs or any others your business needs from scratch is confusing and can lead to security issues. Who has time for that? Especially when you’re trying to grow your business and focus on what really matters.
AI document generation tools give you an easy, cost-effective way to create contracts, legal forms, and the other documents you need to power your business. And, using digital documents is more secure than paper-based documents, especially if you’re using the right tools.
Generating documents using AI means less errors, legal concerns, and time wasted researching what goes into a document. You just have to find the right tool to do it.
Luckily, Docubee’s new AI Document Generator is here to simplify the creation of documents. All you have to do is enter a prompt, and we’ll generate your document for you. From there, you can collect signatures and other useful data from clients using the rest of Docubee’s system.
Get a quick look at how it works in this video.
How Does Docubee’s AI Document Generator Work?
In essence, AI Document Generation is a digital tool which uses the power of AI to generate a document based on a provided prompt. There are different types of document generators out there, and ours is powered by private instance of OpenAI. Docubee does not use public instances of AI technology, which means we never share any information or prompts you enter to keep your data safe.
The AI document generator feature fits right into our Quick Sign experience, meaning you can generate a single document or document packet, place fields, and get signatures in one single tool.
Basically, we’ve taken the process of creating documents and simplified every piece for you.
How to Use Docubee’s AI Document Generator
Using AI document generation from Docubee is incredibly easy and unlocks a world of possibility for your business. Let’s dive in.
Before You Begin
If you don’t have an account, you can try the AI Document Generator by clicking this link.
If you already have a Docubee account, you can access the beta version of the Docubee AI Document Assistant by clicking Quick Sign from your dashboard, as shown below.
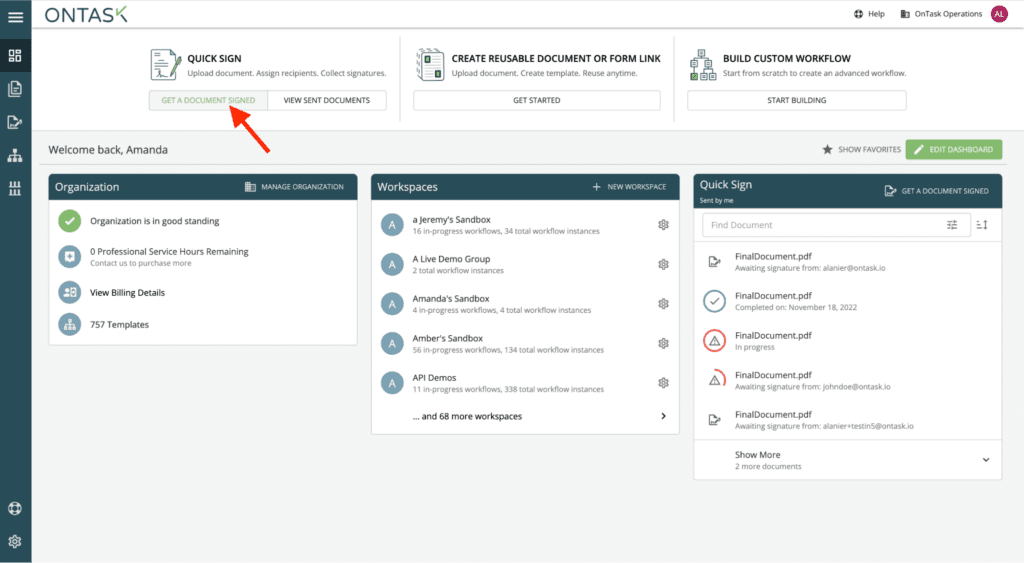
Once you click on the “Get a Document Signed” button, you can select “Docubee Document Assistant” to get started with AI document generation.
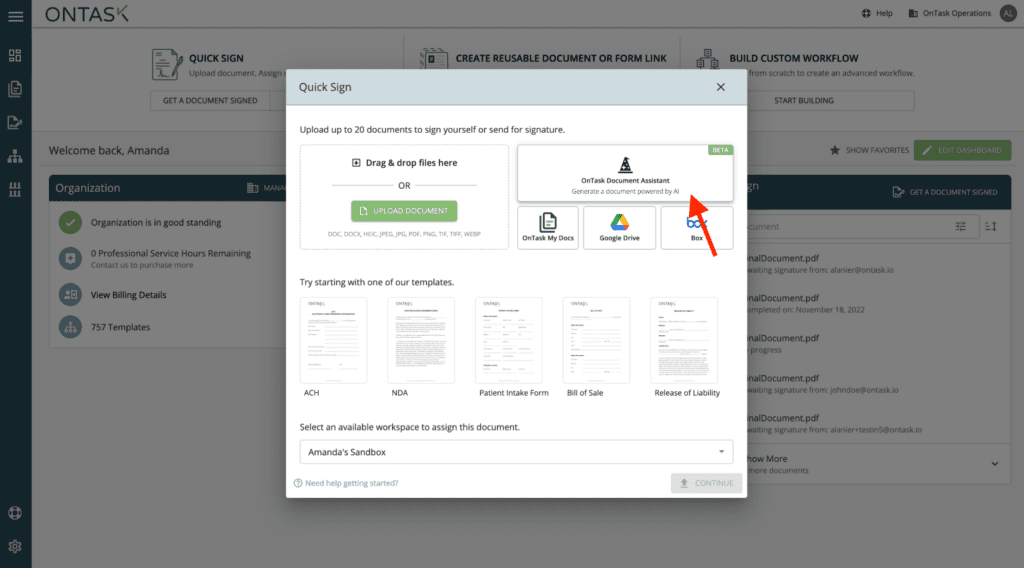
Enter Your Prompt into the Docubee Document Assistant
The first step in generating a document using AI is to enter in a prompt. Our AI generator comes prefilled with the phrase “Generate me a document that…” that lets you fill in the rest.
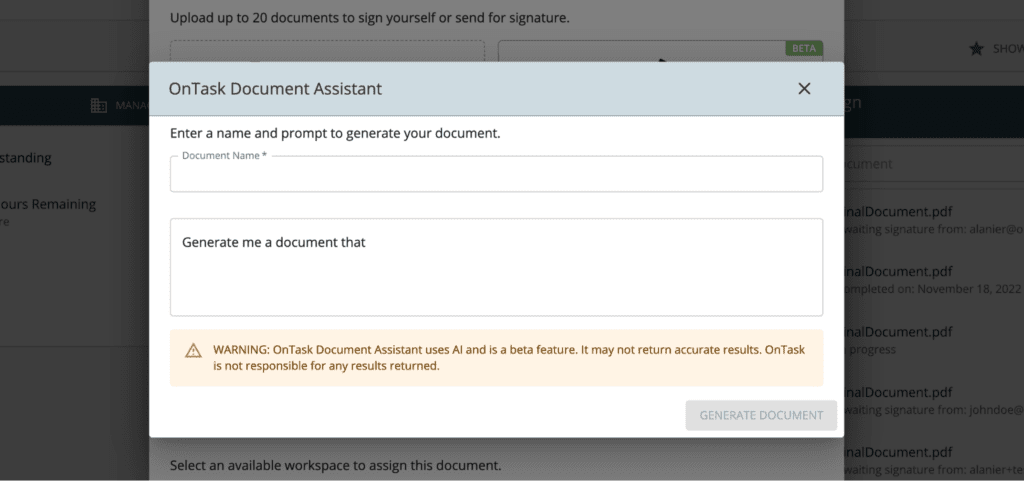
Adding in more details or parameters into your prompt will help the AI generator create a more helpful document for you to use, so be specific.
For example, if you’d like to generate a contract between two businesses for the sales of services, you could enter something like, “Generate me a document that is a sales contract between company A and company B, in which company A is selling marketing services to company B”.
Once you’ve entered your prompt, click the “Generate Document” button.
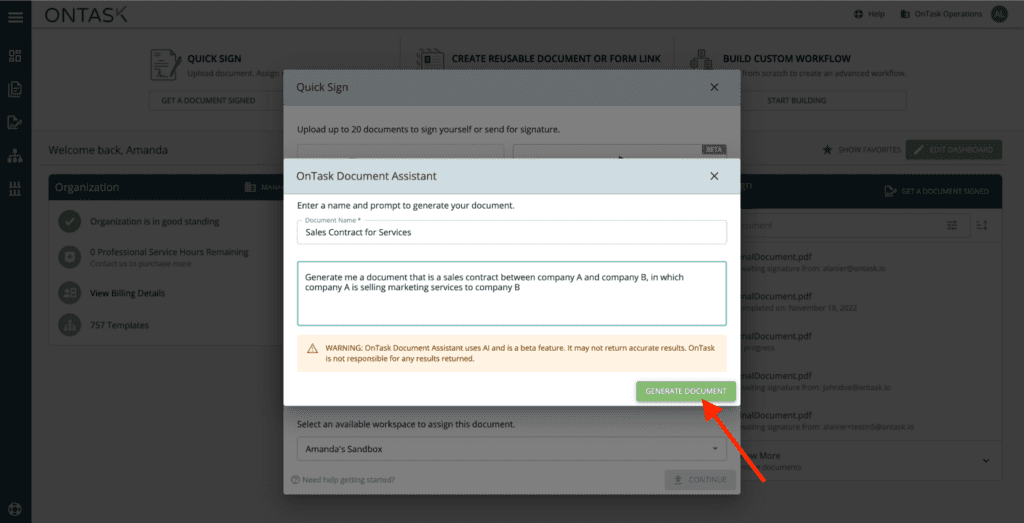
Next, Docubee will generate your document based on the terms you put into the prompt.
Edit Your Generated Document
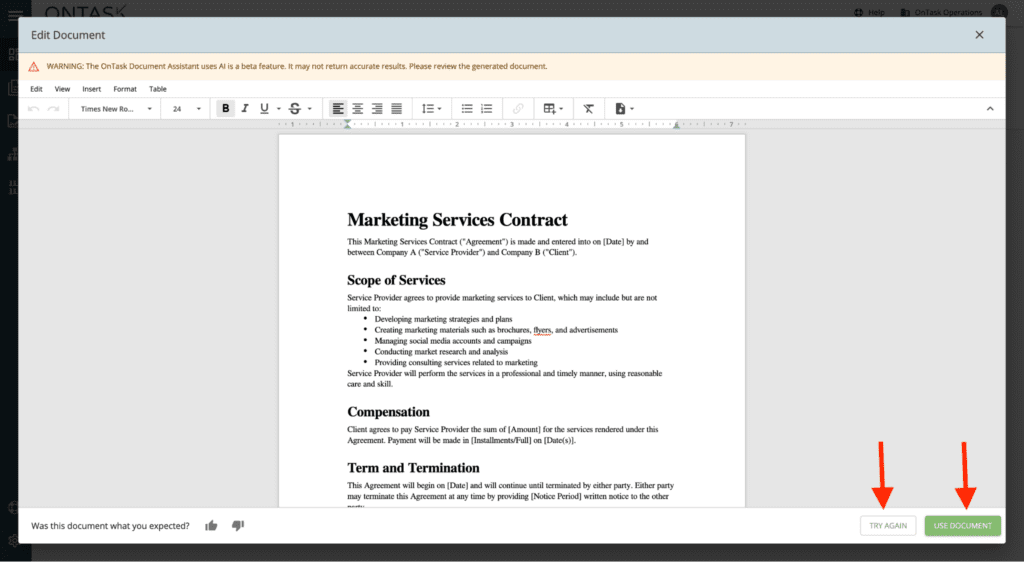
Once your document is created, you will be automatically dropped into our document editor interface. Here, you can add info, change formatting, and make edits as you deem necessary.
If the document is not exactly what you were looking for, you can hit the “Try Again” button to re-generate your document. Once you’re done making edits, hit the “Use Document” button.
Sending Your Document via Quick Sign
Now that you have your document created, it’s time to place fields and collect signatures. You will be dropped back into the Quick Sign uploader after you complete your document.
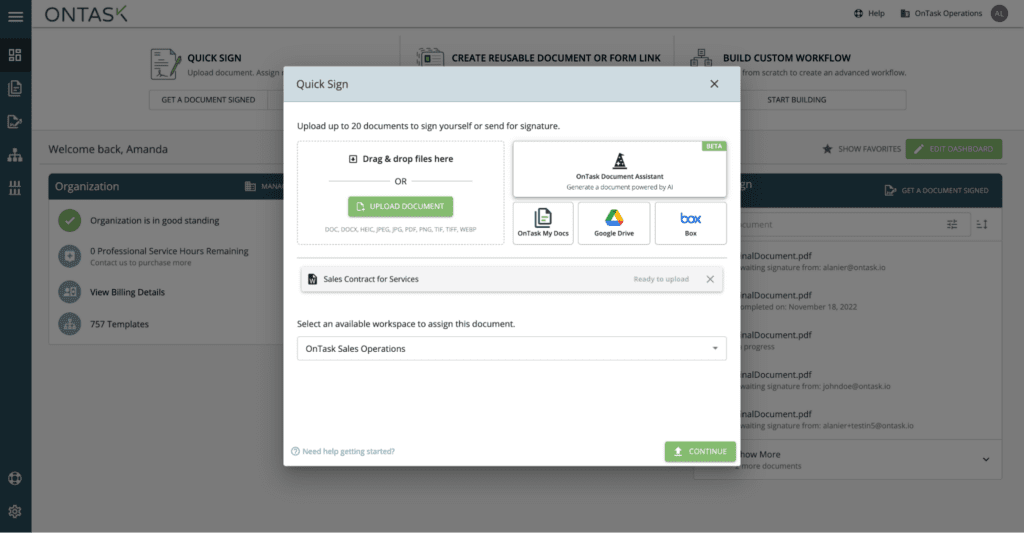
As you can see, your document has been automatically uploaded in Docubee, and you will be given the chance to choose which workspace you’d like it deployed to. You can generate or attach up to 20 documents in a single send if you’d like to create an envelope.
Once all of the documents you’d like to collect signatures on are attached, hit the “Continue” button.
Now, you have the opportunity to select whether you’d like to sign the document yourself or send it to others and sign. For this example, we’ll choose “Send and Sign”.
Since the document we’ve created is a contract, we will add two signers. Hit the “+ Signer” button to add up to 5 participants. Please note, you can also add multiple recipients to receive final copies of the signed document.
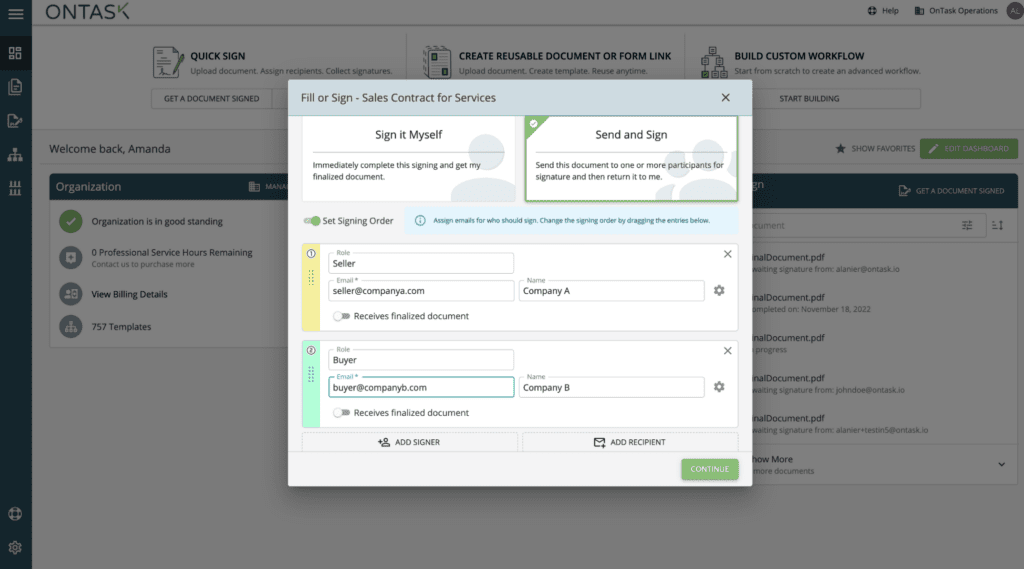
Once you’ve added your signers, hit the “Continue” button.
Preparing Your Document
Once you’ve designated WHO will be signing, it’s time to choose WHERE they will be signing.
The easiest way to get this done is to have Docubee scan your document for fields. Simply click the “Scan for Fields” button as shown below, and Docubee will automatically place signature and date fields.
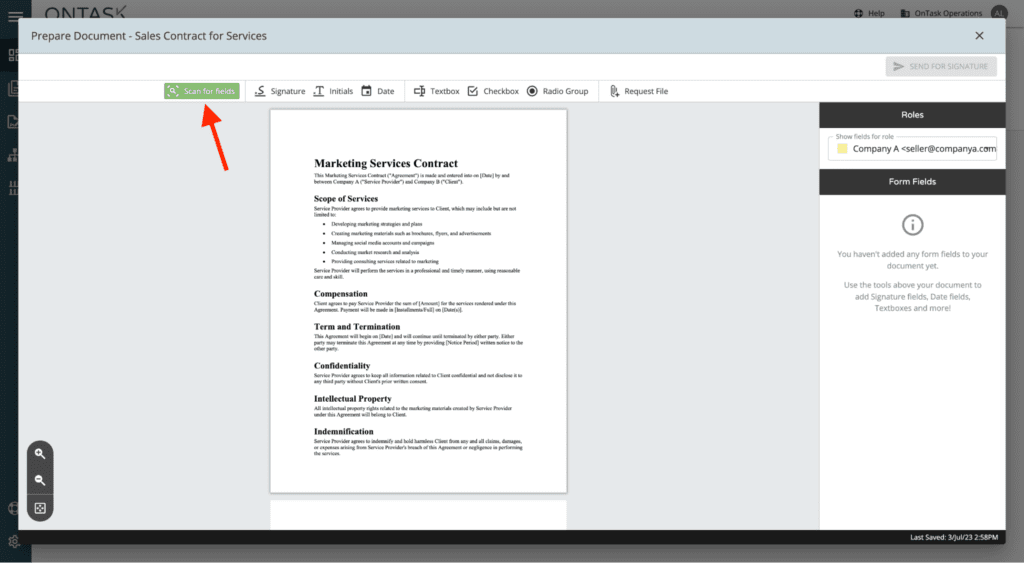
Please note, Docubee will assign all tasks to the first signer listed by default.
To re-assign fields, simply click on the field.
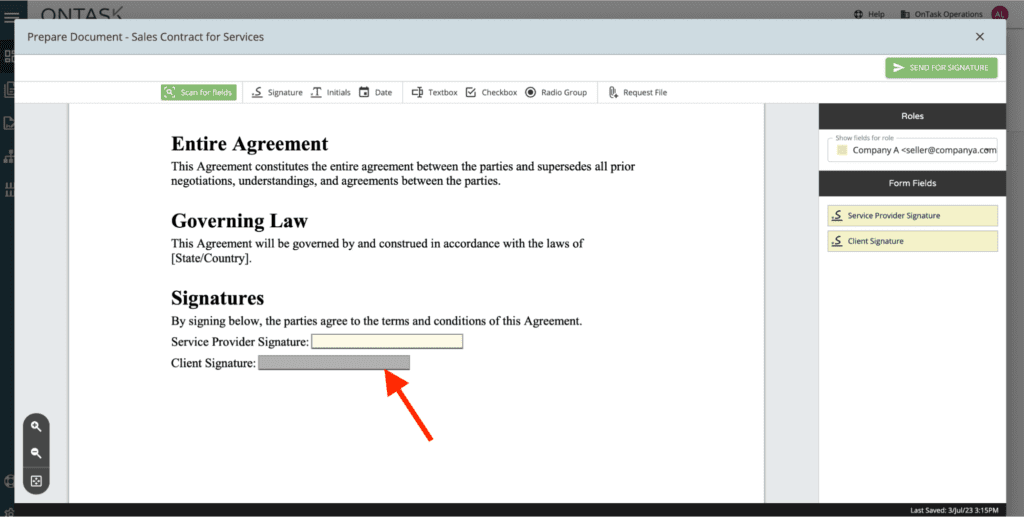
Next, choose which role you’d like to assign the field to and you’re all set. Placed fields can also be rearranged and dragged to different spots on your document.
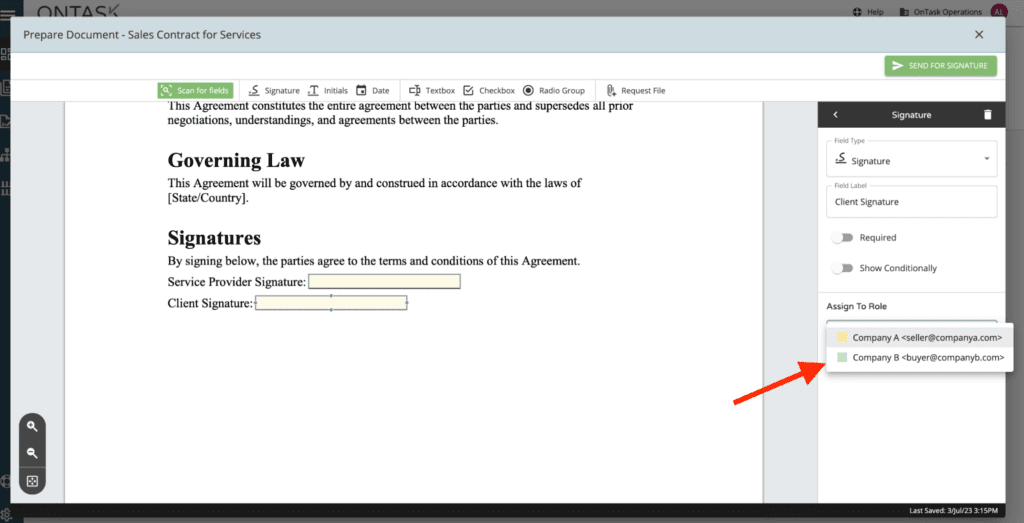
Alternatively, you can manually place fields on your document. Simply click on the field you’d like in the top menu and drag it where you’d like it.

To complete your document, hit the “Send for Signature” button in the top right corner.
Sending Your Document for Signature
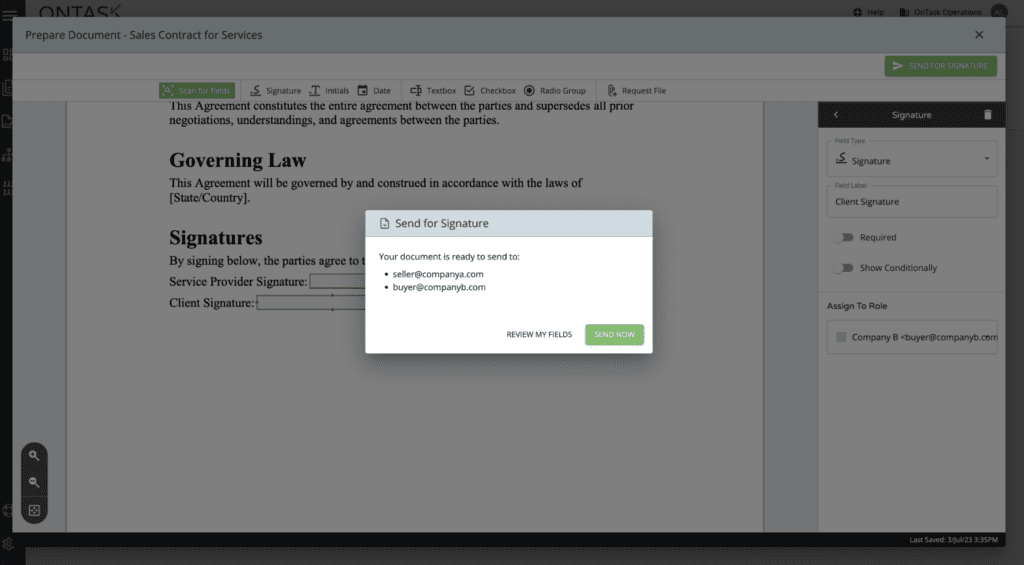
Before sending your document, Docubee will give you a chance to either review your fields or send the document. Hit the “Send Document” button to start collecting signatures.
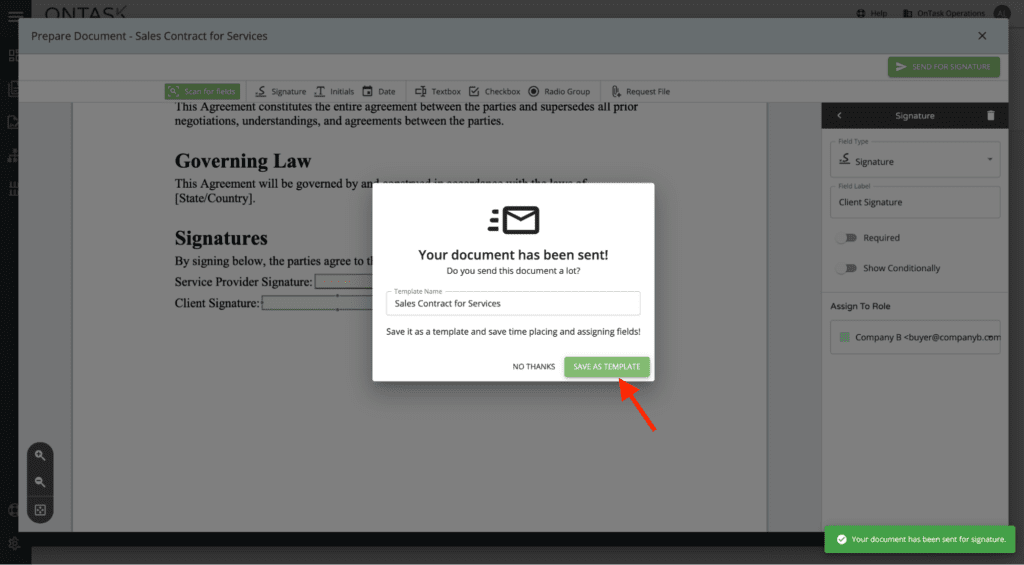
The final step is to create a template from the AI document you created (if you’ll be using it again). Simply click the “Save as Template” button to access this document template and all placed fields again and again.
Quit Doing Things the Hard Way. Automate Today.
Why struggle through paperwork when you could be using AI to help? Try Docubee’s AI Document Generator for free.


