


View our Pricing & Plans for a detailed list and comparison of features available in each plan.
The Documents section’s default tab is the Library and it alphabetically lists your uploaded documents. See Overview of the Documents Section for more information on the Documents section.
The Library Tab
Access all your uploaded documents in one central location. Search for documents by name, add new ones, and perform various actions using both the quick access buttons and the More Actions menu.
Always ensure you have selected the correct workspace using the workspace selector at the upper-left corner.
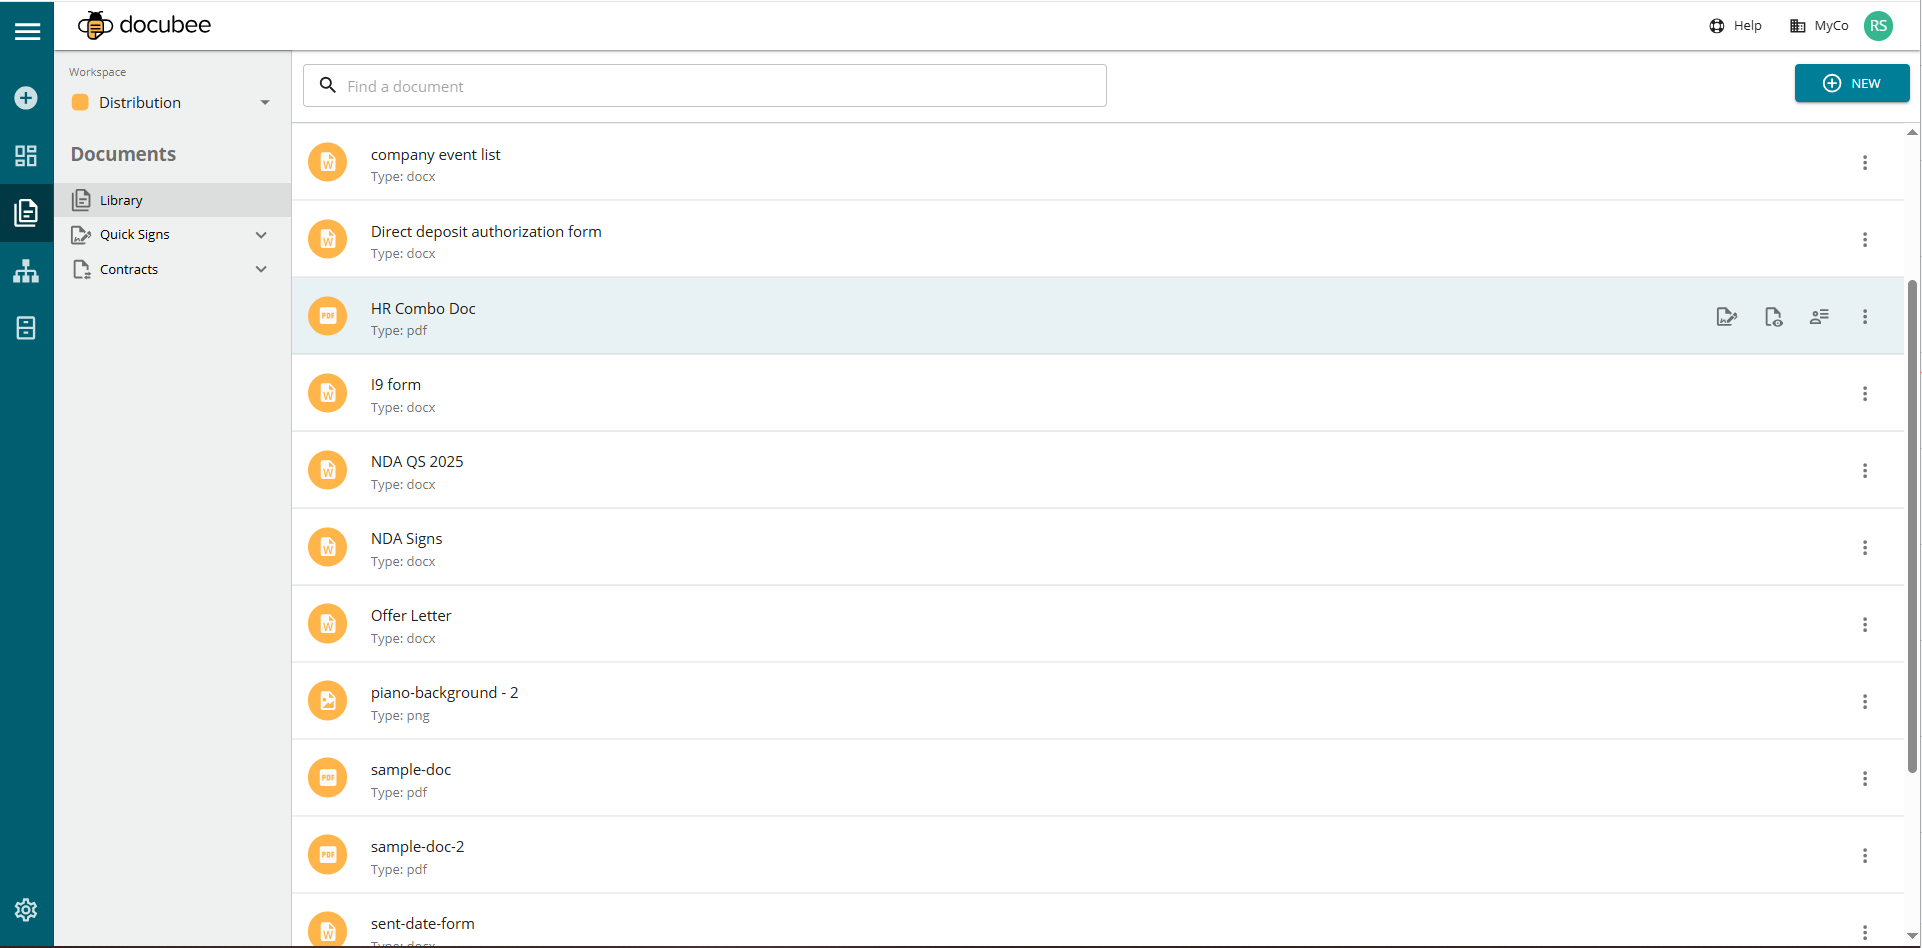
Search the Library
Use the Find a document search bar at the top to locate a file by name in your Library.
Add a Document to the Library
- First select the workspace to which you want to add the document using the workspace selector at the upper-left corner.
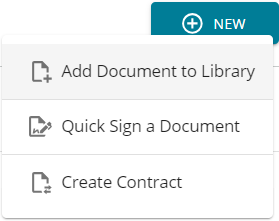
Note: Only workspaces that you have permission to view will be available. - At the upper-right corner, click the New button and select Add Document to Library to open the Add a Document modal.

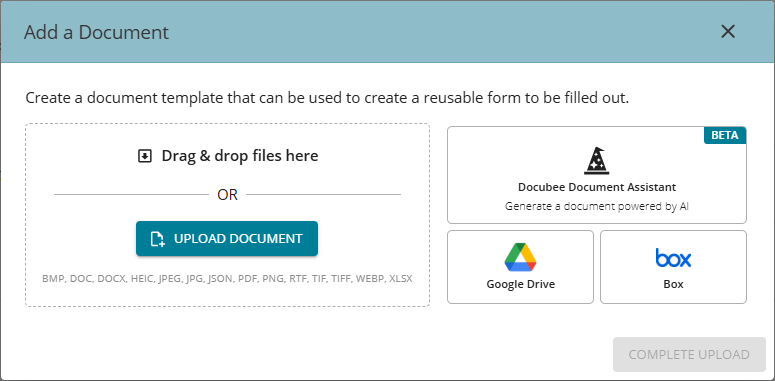
- We make it extremely convenient for you to upload documents from various sources.
In the Add a Document modal, click one of these buttons:- Upload Document or drag & drop files here
- Docubee Document Assistant
- Google Drive
- Box
- Select the document(s) to upload.
- The selected document(s) will be listed on the modal as ‘Ready to upload’.
- Click Complete Upload to upload the selected documents to the Library.

You will see the uploaded documents listed in the Library. The Documents Library scrolls to and highlights newly uploaded documents, making them easier to find. You can access these documents from your library for your Quick Signs, contracts, etc.
See Starting Points to Add a New Document for information on another way to Add a New Document in the Docubee Library.
Quick Access Actions
For quick access, frequently used document actions are available as icons. Hover over an uploaded document to see these actions on the right side:
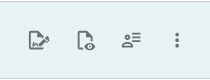
- Send for Quick Sign Document
- Preview File
- Edit Template
- More Actions menu (three dots icon)
These frequently used actions along with the rest of the actions are in the More Actions shortcut menu.
More Actions Menu
The More Actions menu has several document actions and a Quick Sign action. The Quick Sign action is to view all Quick Signs originating from the selected document.
Before choosing the Quick Sign Document option, you may want to further prepare your document using the other options in the More Actions menu. For example, you can edit the document (use the Edit Document option), add/modify roles and fields (use the Edit Template option), stamp the document and enter data (use the Stamp Document option), or use any of the other options available in the menu.
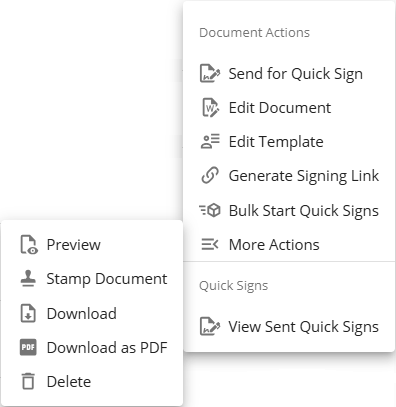
Document Actions
Send for Quick Sign Document
Opens the Fill or Sign modal where you can choose to sign the document yourself or send it to participants for signing. See Quick Sign for more information.
- If no fields were placed on the document before sending for signing, a custom signature page will be added to the end of the document with signature and date fields for the specified number of signers.
- If you decide to add/modify roles and form fields on the document now, use the Manage Roles and Fields option before sending your document for signing.
Edit Document
This action requires Admin privileges and is only available if your document is a DOCX file (a Microsoft Word document).
Opens the document in collaboration mode where you can make edits or suggestions before or after the document has been sent through a workflow or Quick Sign. Anyone in your workspace with admin permissions can collaborate on DOCX files in real time in your library. You get the most recent document available anytime you access it while keeping management in one platform.
Edit Template
This action requires Admin privileges.
Opens the document and allows you to add/modify the roles and form fields. The right section displays the roles and their assigned form fields that they will have to fill.
- In the right bar under Roles, click the Manage Roles button to open the Manage Roles modal, where you can add more roles or edit existing ones. You can have up to 20 roles on a document.
- Add fillable fields to the document using the fields list on the top row below the document header. The fillable fields available are: Signature, Initials, Date, Textbox, Checkbox, Radio Group, and Request File.
- In the right section under Form Fields, you can edit the form fields’ settings to suit your input requirements.
Note: When you add a field, “Preview Text” appears by default to assist with document preparation. Modify the preview text, font type and size to customize the text appearance within your document. This preview text does NOT appear when a workflow runs. It is only to provide you a preview of the content’s appearance on the document before finalizing. - Only signees associated with a particular role will be able to fill these fields. This feature was created with reusability in mind. Email addresses for these roles can only be provided when sending them for signatures, making the document useful for multiple occasions.
Note: Each role has a color code, and the fields assigned to each role have the same color. This helps distinguish which field is tied to which role.
Generate Signing Link
Opens the Generate Signing Link modal that has a URL and a QR code for the quick sign document that you can copy and share with your signee(s).
- Use the QR code on physical signage or in place of a link.
- Static signing links allow for easy access to forms by anyone who needs to fill and sign them. Include these links in mass email sends, post them on your site, or wherever your employees or customers may need to access them. These links are particularly useful for frequently filled and signed items such as waivers, registration forms, and pre-entry screenings that don’t necessarily need to be emailed to a customer.
Bulk Start Quick Signs
Opens the Bulk Start Quick Signs modal where you upload a CSV file. You can bulk start up to 250 quick sign instances so your CSV file can have a maximum of 250 rows. Click Bulk Start Quick Signs to initiate the process.
You can turn on the following using the toggle switches:
- Set Signing Order – When turned on, emails are sent to each signer sequentially. When turned off, emails are sent to all signers simultaneously.
- Cancel bulk started process on failure – When turned on, it lists failed processes and provides a Download Report button to download the report of failed processes. You can then restart the failed processes.
More Actions
Preview
Provides a preview of the entire document in a popup viewer.
Stamp Document
This action requires Admin privileges.
Opens the document and allows you to apply stamps on it. You can enter content in the stamps that you placed on the document using the following as guidelines:
- Enter your data in the stamps and save it by clicking Make Changes Permanent at the upper-right corner.
- You are prompted with a message that the changes will be permanent and cannot be edited. Click Stamp Document to confirm or click Cancel to reject.
Download
Downloads the document to your computer.
Download as PDF
This action is available if your document is a DOCX file (a Microsoft Word document).
Downloads a PDF of the document to your computer.
Delete
This action requires Admin privileges. The delete action cannot be undone.
- Prompts you for confirmation to delete the document.
- Click Delete Document to confirm and proceed with the deletion.
Quick Signs
View Sent Quick Signs
Navigates to the Documents | Quick Signs tab and displays all signing instances started with this document. See Quick Signs tab for more information.
Related Information
Overview of the Documents Section
Overview of your Docubee Dashboard
Additional Resources
Need more help getting set up? Contact us for assistance from our customer support team or register for Office Hours.