Patient forms. Partnership agreements. Onboarding documents. No matter what your business specializes in or its size, one thing is always the same: there always seems to be paperwork that needs daily management. Doing it all manually is time-consuming, leaves room for error and even worse — creates opportunities for compliance and security issues.
Not to mention the wasted time spent searching for lost pages.
Thankfully, that’s old news for companies choosing to digitize paper forms. If you’re not already using electronic forms in your processes, now is the time to start.
So, how do you digitize forms? We’ll cover that and more.
What is a Digital Form?
A digital form is an electronic version of a document, such as a Non-Disclosure Agreement, invoice, or contract you can fill out and send digitally. The information collected in digital forms can be used to generate binding documents. Common examples of electronic forms include:
- Invoices
- Payroll records
- Tax documents
- Sales agreements
- Waivers
- New student forms
- New hire checklists
Digital forms are also called e-forms, electronic forms, online forms, and web forms.
They come in various formats, including PDF, JPEG, and IMG. A digital form has all the same fields as a paper form. Going from a paper form to digital is easier (and cheaper) for people to fill out because it doesn’t require printing.
What are the Benefits of Using Digital Online Forms?
You likely know all too well that the to-do list for administrative duties is never-ending. There are documents to create, review, and sign. Of course, you must also ensure recipients receive their copies and submit signatures. If there’s an opportunity to increase your efficiency to better focus on income-generating tasks, wouldn’t you take it?
Now you can by digitizing paper forms. Here’s an overview of the benefits you get when you convert paper forms to digital:
- Faster processing times: Save time by removing the need to scan and file paper forms. You also reduce errors by creating pre-filled form templates.
- Reduced errors: Prevent form mistakes by creating pre-filled templates—no more wrong numbers, names, dates, or forgotten sections.
- Easier access: Make documents accessible to your team or client on any device with internet access. They can even fill and sign paperwork virtually.
- Less storage space needed: Stop wasting space on paper forms. There’s no need for non-secure filing cabinets, boxes, and shelves when you use digital forms.
This all sounds great, but how does it work? Let’s review what the process looks like.
How Can I Digitize Forms?
There are two ways to create an electronic form. You can either scan an existing document and upload it to your computer as a PDF, or use your mobile device to take a photo and upload it to your computer. To convert it into a PDF, you’ll need a conversion tool.
How to Create an Electronic Form
Creating electronic versions of documents isn’t difficult when you have the right tools. Software exists to make the process simpler. Some convert images of documents into a PDF.
Some web tools available for the task include:
These are website platforms, so no download is necessary. Plus, they’re simple to use—just upload your .doc or image document and click convert. Once you download your PDF document, you can use other tools to manipulate the forms (e.g., add fillable fields and eSignatures).
Some allow you a set number of free eSignatures and downloads per month, or you can pay for a monthly plan:
While these offer the features needed to create and download fillable, eSigned documents, they lack the tools professionals need to get the job done. Your role isn’t just paperwork—it requires seamless workflows to make your job easier.
Other essential capabilities for your form digitization process include document population and the ability to use merged data captured from other internal systems or web forms. Conditional logic that allows you to create if/then rules to automate processes is also key.
This is where an all-in-one solution is beneficial—Docubee empowers businesses to:
- Create new forms (using customizable templates)
- Upload PDFs or images of documents
- Download Doc and image files as PDFs
Aside from simplifying document management and workflows, Docubee enables you to track vaccine statuses to ensure workers comply with regulations.
Let’s look at how Docubee makes form digitization a breeze.
How to Digitize Forms Using Docubee
Docubee offers an intuitive platform to simplify uploading, creating, and converting documents—all in one dashboard.
Just follow these steps.
Step 1: Upload Your Form
First, upload the form you’d like to convert to a fillable form. You can start with an existing PDF, Word document (DOC, DOCX), XLSX, or even a scanned image.
At the upper-right corner, click the New button and select Add Document to Library to open the Add a Document modal.
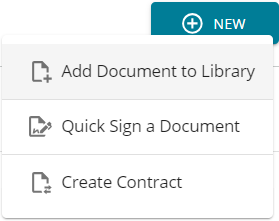
In the Add a Document modal, click on one of the below buttons based on where you’d like to grab your document from:
- Upload Document or drag & drop files here
- Docubee Document Assistant
- Google Drive
- Box

Now, select the document(s) you want to upload. These selected document(s) will be listed on the modal as ‘Ready to upload’.

Click Complete Upload to upload the selected documents to the Library.
View Overview of the Documents Section for information on possible next steps.
Now that your document is uploaded, you can do a quick (legally binding, secure, and compliant) eSignature and either send it to yourself or someone else (if you don’t need to add any fields or assign roles to other signers).
Click Quick Sign to start the process:
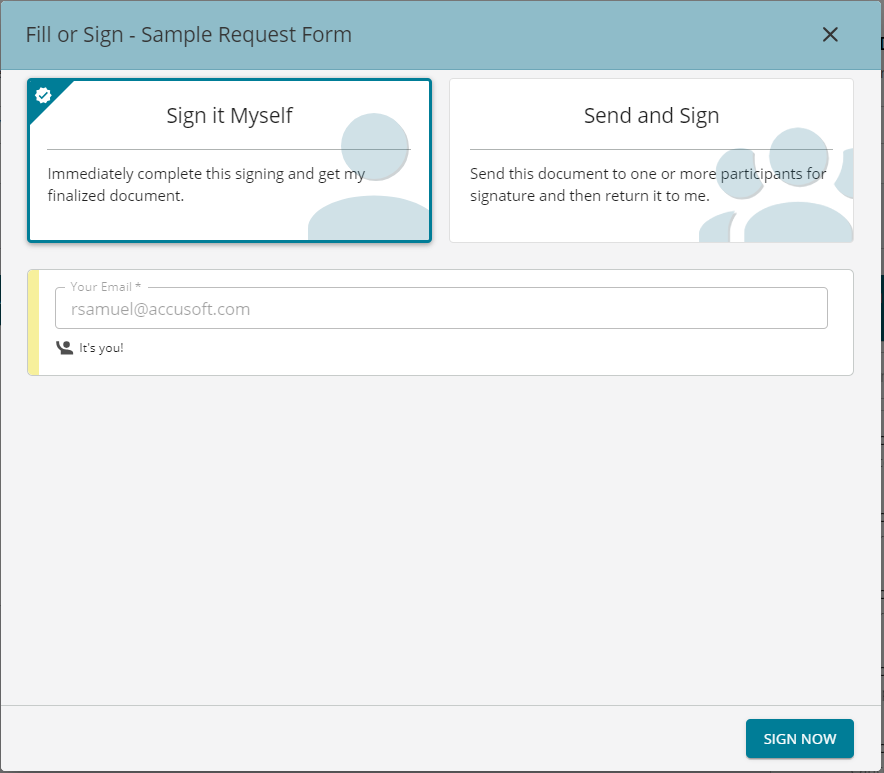
Add your email and other signers or recipients (those who need to see the document, but not sign it).
Otherwise, click Manage Roles and Fields and move on to the next step.
For additional information on setting up documents for signatures, check out our Quick Sign Overview.
Step 2: Decide How Users Will Sign
After uploading a document, you can either generate a link to send to others to view or eSign the form. Or you can create a reusable template to send to different people over time.
The latter is ideal for repetitive processes, like onboarding or offboarding new hires.
Step 3: Set Your Roles
After deciding how users will sign, it’s time to set the roles for those who need to complete this form. You can even rename the roles to be more specific to your process.
Read about Manage Roles and Fields in Overview of the Documents Section.
Step 4: Scan for Fields
Here is where Docubee really helps you with some of the heavy-lifting in form creation. With most forms, fields can be auto-detected and placed automatically using the Scan for Fields button. You can also manually add fields, such as:
- Text fields
- Checkboxes
- Dates
- Electronic Signatures
- Initials
Once you’ve placed each field, you can adjust the size of each field to fit your form and decide if it should be required or not. You can also create a Property Name for each field to reuse them across other digital forms in your workflow.
See Using the Intelligent Forms Field Extractor for more information on scanning documents to extract fields.
Step 5: Start Using Your Form Instantly
Click Publish and that’s it! Your form is deployed to the web immediately, and you can start using it right away.
Next Steps
Now, you’re on your way to getting your forms returned faster and more accurately from clients, vendors, employees, or whoever you need to.
Want more information? Browse our resource center for more ways to automated with Docubee.